跳到内容
跳到内容 

Ever wondered how complex plastic parts are made so perfectly every time? The process seems like a factory secret. This makes it tough to know if you're getting good quality and value.
Injection molding1 works by melting plastic material2, injecting it into a custom mold3 under high pressure4, and then cooling it to form a solid part. This cycle repeats rapidly, allowing for the mass production5 of identical items with high precision and efficiency.

I've spent my entire career, over 15 years now, in the custom molding industry. From our factory in Dongguan, I've helped clients in automotive, cosmetics, and electronics turn their ideas into reality. The technology gets better every year, but the core process remains the same. It's a series of careful, controlled steps. Breaking it down makes it easy to understand. Let's walk through the entire journey a piece of plastic takes, from a raw pellet to a finished product in your hands.
How Do You Prepare Plastic for Molding?
You can't just dump raw plastic into a machine and expect good results. The material itself is the foundation of the final product. Getting this first step wrong will cause defects later on.
Proper preparation involves selecting the right plastic, drying it thoroughly to remove all moisture, and then mixing it evenly with colorants. This ensures the material will flow correctly and the final part will be strong and have a consistent color.

Think of it like baking a cake. You wouldn't use wet flour or forget to mix in the cocoa powder. The same principle applies here. In my early days, I saw a client's project fail because of moisture in the plastic. The parts came out with silver streaks and were incredibly brittle. It was a costly lesson in the importance of preparation. This initial phase is non-negotiable for high-quality manufacturing, and we break it down into three critical tasks.
The Three Pillars of Material Prep
-
Material Selection: The first choice is the most important. Are we making a durable car part or a simple toy? Each application requires a different type of plastic. We work with materials like ABS for toughness, Polycarbonate (PC) for clarity and strength, and PEEK for high-temperature applications. We choose the material based on the client's needs for strength, flexibility, temperature resistance, and cost.
-
Drying: This is the most overlooked step by beginners. Most plastics are "hygroscopic," meaning they absorb moisture from the air. If this moisture isn't removed, it turns to steam during heating. This steam creates bubbles and weaknesses in the final part. We use industrial dryers6 to heat the pellets at a specific temperature for several hours, bringing the moisture content down to an acceptable level, often below 0.02%.
-
Coloring and Mixing: To get the perfect color, we add a "masterbatch7" or color pigment to the natural plastic pellets. It's crucial that this is mixed perfectly. Uneven mixing leads to color streaks or swirls in the final product. We use large tumblers or mixers to ensure every pellet is evenly coated before it enters the machine.
How Does Plastic Get Inside the Mold?
The plastic is prepped, but it's still a solid pellet. Getting it from the hopper into the tiny, complex cavities of the mold is the heart of the process. It's a combination of intense heat and powerful force.
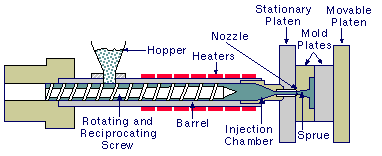
The solid plastic pellets are melted into a liquid state inside a heated barrel. A large screw then injects this molten plastic into the closed mold cavity under extremely high pressure, ensuring it fills every single detail of the shape.

This is where the real power of the injection molding machine comes into play. I always tell my clients that this stage is a high-speed, high-pressure event that lasts only a few seconds. The machine has to be perfectly calibrated to control two key processes: transforming the solid into a liquid, and then forcing that liquid into the mold with precision. It's a delicate balance. Too much heat can burn the material, while too little pressure can result in an incomplete part.
From Solid to Liquid: Plasticization
The plastic pellets are fed from a hopper into a long, heated barrel. Inside this barrel is a large rotating screw.
- Heating: The barrel has several heating zones, each set to a precise temperature. As the screw turns, it carries the pellets forward through these zones.
- Friction: The screw's rotation also creates intense friction and shear force. This friction generates a significant amount of heat, which helps melt the plastic pellets uniformly.
- Homogenization: By the time the plastic reaches the front of the barrel, it's a consistent, molten liquid, like a very thick honey. We call this molten plastic the "shot."
The Injection Shot
Once enough molten plastic is ready, the injection phase begins. The screw stops rotating and acts like a plunger. It pushes forward with immense force, injecting the shot of molten plastic through a nozzle and into the mold. The pressure can be incredibly high—often between 10,000 to 30,000 PSI. This force is necessary to push the plastic into every corner and detail of the mold cavity before it starts to cool.
How Does the Liquid Plastic Become a Solid Part?
The mold is now filled with hot, liquid plastic, but it's not a usable part yet. It needs to be solidified into a stable shape and then safely removed from the tool without damage.
The mold is kept under pressure to compensate for material shrinkage as it cools. Coolant circulates through channels in the mold to harden the plastic. Once solid, the mold opens, and ejector pins8 push the finished part out.

This stage determines the final dimensions and stability of the part. If you cool it too fast, the part can warp. If you don't hold enough pressure, you can get sink marks. I remember a project for a cosmetics brand where the caps needed a perfect, glossy finish. We had to fine-tune the cooling time and packing pressure9 for days to prevent tiny surface defects. It's a science of temperature and time.
The Two-Step Solidification Process
| Stage | Purpose | Key Actions |
|---|---|---|
| Packing and Cooling | To compensate for shrinkage and solidify the part. | After the initial injection, the machine applies a constant "packing" or "holding" pressure. This forces a little more plastic in to make up for the material shrinking as it cools. Simultaneously, coolant (usually water) flows through channels inside the mold walls, drawing heat away from the plastic. This phase is the longest part of the entire cycle. |
| Ejection | To safely remove the finished part from the mold. | Once the part is hard enough, the machine releases the clamping pressure holding the mold halves together. The mold opens, and a system of "ejector pins" or plates pushes forward from one side of the mold. These pins push the part out of the cavity, allowing it to fall into a collection bin or be picked up by a robotic arm. |
The timing of each step is critical. The goal is to make the part solid enough to be ejected without deforming, but to do it as quickly as possible to keep the cycle time low and production efficient.
Is the Part Finished When It Leaves the Mold?
The part is out of the machine, but the job isn't done yet. A freshly molded part is rarely ready to be shipped directly to the client. There are almost always small finishing touches and checks required.
No, the part often requires post-processing10. This includes trimming away excess plastic, known as "flash" or the "gate," followed by a thorough quality inspection11 to check for any defects. Some parts may also need assembly or special packaging.

This final stage is our last chance to guarantee perfection. At Ambition Industrial, we serve high-end clients who expect flawless products. A tiny bit of extra plastic or a small surface blemish can lead to a whole batch being rejected. That's why our post-processing and quality control are just as rigorous as the molding process itself. We have a dedicated team whose only job is to ensure that every single part meets the client's exact specifications.
The Final Steps to Perfection
-
Degating and Trimming: The molten plastic enters the mold cavity through a channel called a "gate." When the part is ejected, this small piece of plastic is still attached. We have to remove it. This can be done manually with trimming tools, or it can be automated. Sometimes, a thin line of excess plastic, called "flash," can squeeze out where the mold halves meet. This also needs to be carefully trimmed away.
-
Quality Inspection: This is the most important part of post-processing. Our quality control team checks the parts for a range of potential issues:
- Dimensional Accuracy: Does the part match the CAD drawing12? We use precision tools like calipers and CMM machines to measure critical dimensions.
- Visual Defects: We look for sink marks, burn marks, color streaks, flash, or any surface imperfections.
- Functional Tests: For some products, we might perform tests to ensure they fit with other components or can withstand a certain amount of force.
-
Assembly and Packaging: If the part is one component of a larger product, it moves to our assembly line13. Finally, the approved parts are carefully packaged according to the client's requirements to protect them during shipping.
Conclusion
From raw material prep to final inspection, injection molding is a precise, multi-stage process. Each step is critical to creating a high-quality, finished plastic product ready for the world.
Reference
Explore this link to understand the fundamentals of injection molding and its applications in various industries. ↩
Find out about the different plastic materials suitable for injection molding and their properties. ↩
Learn about custom molds and how they are designed to meet specific production needs. ↩
Understand the significance of high pressure in ensuring the quality of molded parts. ↩
Discover how injection molding facilitates efficient mass production of identical plastic parts. ↩
Learn how industrial dryers work to prepare plastic materials for molding. ↩
Discover the role of masterbatch in achieving consistent color in injection molded products. ↩
Find out how ejector pins help in safely removing finished parts from molds. ↩
Learn about packing pressure and its role in compensating for material shrinkage. ↩
Discover the importance of post-processing in ensuring the quality of molded parts. ↩
Learn about the quality inspection process and its significance in manufacturing. ↩
Explore the importance of CAD drawings in designing and manufacturing molded parts. ↩
Discover how assembly lines integrate with injection molding for product completion. ↩