跳到内容
跳到内容 

Are you tired of manual labor costs from separating parts and runners? This complex process slows down production and eats into your profits, making automation seem like a distant dream.
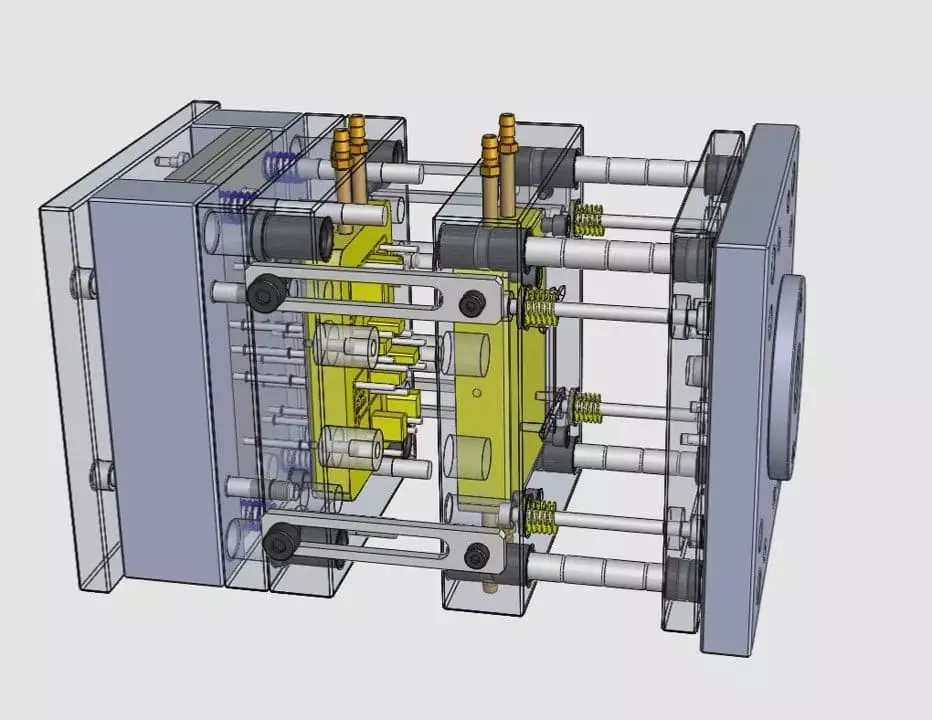
A 3 plate mold1 is an injection mold design that automatically separates the plastic part from its runner system during the molding cycle. It uses a third plate, the runner plate, to create a separate parting line, allowing for automated, high-efficiency production and flexible gating options2.

Choosing the right mold type is a critical decision. It impacts everything from your initial investment to your long-term operational costs. A 3 plate mold offers incredible benefits for automation, but it isn't a universal solution. Understanding its core mechanics, design challenges, and economic implications is key to making a smart investment. Let's explore if this advanced tool is the missing piece in your manufacturing puzzle.
How does a 3 plate mold actually work?
Struggling with slow cycle times and manual gate trimming? This post-processing work adds labor costs and creates inconsistencies, making it difficult to scale up production efficiently and reliably.
A 3 plate mold works by using three main plates to create two separate openings in a specific sequence. First, the runner breaks away at the gate. Then, a second opening allows the part to be ejected, leaving the runner system3 to be ejected separately. This automates the entire process.

The magic of a 3 plate mold is not just that it has an extra plate. Its real value is in the carefully engineered system that separates the production part from the runner scrap. Think of it as creating two separate manufacturing flows that work together perfectly. One flow is for your product, and the other is for the plastic that gets it there. The biggest challenge for us as mold makers is to get the timing of these openings exactly right.
I remember a project for a client making cosmetic packaging. The caps were small and needed a perfect finish, with no gate mark on the side. A standard 2 plate mold would have left a noticeable blemish. By using a 3 plate mold, we could place a tiny pin-point gate on top, which was almost invisible after it automatically sheared off. The success of that project depended entirely on the precise coordination of the mold's opening sequence. If the timing is off even by a fraction of a second, the runner can get stuck, or the part can be damaged. This is why the mold's internal structure, guide pins, and overall rigidity are so important. It's a system built on precision.
The Opening Sequence Breakdown
To truly grasp how it works, let's compare the steps side-by-side with a standard 2 plate mold.
| Step | 2 Plate Mold Process | 3 Plate Mold Process |
|---|---|---|
| 1. Injection | Molten plastic fills the cavity and runner. | Molten plastic fills the cavity and runner. |
| 2. Cooling | Part and runner cool and solidify together. | Part and runner cool and solidify together. |
| 3. Opening | The mold opens at the single parting line4. | The mold first opens at the runner parting line, breaking the small gates. |
| 4. Ejection | The ejector pins push out the part and runner together. | A second opening at the main parting line occurs. The part is ejected. The runner is ejected separately. |
| 5. Post-Process | A worker or robot must manually separate the part from the runner. | No manual separation is needed. The process is ready for the next cycle. |
This systematic separation is the core of its efficiency, eliminating an entire step from your production line.
Why is the gate design the key to a successful 3 plate mold?
You want a perfect, blemish-free part, but gating leaves ugly marks. Finding a way to feed plastic into the mold without affecting the final appearance is a constant battle for high-end products.
Gate design is critical because a 3 plate mold relies on a small "pin-point" gate that can automatically break off cleanly. The entire system of puller pins and levers is designed around making this tiny connection snap perfectly, ensuring a clean part and reliable runner ejection every time.

The most difficult part of designing a 3 plate mold is finding the perfect balance at the gate. The pin-point gate is what makes automatic separation possible. But it's a double-edged sword. Because the gate is so small, it can be difficult to push high-viscosity plastics, like some types of PC or Nylon, through it without issues. This is where deep engineering knowledge becomes critical. We have to think about more than just the mechanical structure. We have to understand how melted plastic actually behaves.
We need to calculate exactly how the plastic will flow, how much pressure is needed, and how it will shrink as it cools. This helps us design the perfect "puller" features that grab the runner and the precise angle at which the gate will break. I recall working with an electronics developer on a housing that used a flame-retardant ABS. The material was expensive and sensitive to high shear stress. A poorly designed gate would have degraded the material, compromising the product's safety rating. We spent weeks simulating the flow through different gate sizes to find the sweet spot. It had to be small enough to break cleanly but large enough to fill the part without damaging the plastic's properties. That’s the real art and science of 3 plate mold design: balancing perfect separation with material integrity.
The Balancing Act of Gate Design
The gate's performance is a trade-off between multiple factors. Success depends on getting this balance right.
| Design Factor | Goal | Potential Problem if Wrong |
|---|---|---|
| Gate Size | Small enough for a clean, automatic break. | Too small: High shear stress, material degradation, or incomplete filling. Too large: Won't break cleanly, leaving a large blemish. |
| Gate Location | Positioned for optimal flow and aesthetics (often on top). | Poor location can cause weld lines, air traps, or be visually unappealing. |
| Runner Puller | Reliably pulls the runner away from the part. | Fails to pull the runner, causing the mold to jam and stop production. |
| Cooling Channels | Cool the gate area effectively to ensure a clean break. | Inadequate cooling leaves the gate soft, causing it to tear instead of snap, leaving a stringy mess. |
Mastering these elements is what separates a mold that simply works from a mold that runs flawlessly for millions of cycles.
When does a 3 plate mold actually make financial sense?
You're quoted a high price for a 3 plate mold and wonder if it's worth it. The initial investment seems steep, and you're not sure if the promised efficiency will ever pay off.
A 3 plate mold makes financial sense for high-volume production5 where automation is a priority. The higher initial cost is justified by eliminating manual labor for gate removal, reducing cycle times6, and minimizing waste of expensive materials. It's an investment in long-term efficiency.

Choosing a 3 plate mold is a business decision, not just a technical one. We often see clients fall into one of two traps: either they are scared off by the higher upfront cost, or they insist on one for a low-volume project where it's overkill. The right choice comes down to looking at the total cost over the mold's entire life. A 3 plate mold is more complex. It has more moving parts, which means more design time, more machining, and potentially more maintenance.
However, in the right situation, the return on investment is huge. We worked with a large developer of educational toys. Their products involved many small, intricate parts. With a 2 plate mold, they would have needed several employees just to snip parts from runners all day. By investing in 3 plate molds, they enabled a fully automated process. The parts fell directly onto a conveyor belt ready for assembly. The reduction in labor costs paid for the more expensive molds in less than a year. The key is volume. If you're only making a few thousand parts, the extra cost is hard to justify. But if you're making hundreds of thousands or millions, the efficiency gains are undeniable.
Economic Decision Framework: 2 Plate vs. 3 Plate Mold
Before you decide, weigh these factors carefully. The best choice depends on your specific project goals and production scale.
| Factor | 2 Plate Mold | 3 Plate Mold | The Verdict |
|---|---|---|---|
| Initial Mold Cost | Lower | Higher (20-30% more) | 2 plate wins for low budgets and prototypes. |
| Cycle Time | Slower (if manual separation is included) | Faster (fully automated cycle) | 3 plate wins for high-volume efficiency. |
| Labor Cost | High (requires manual de-gating) | Zero (fully automated) | 3 plate offers massive long-term savings. |
| Material Waste | Runner can be large and complex | Runner system is often more complex/larger | Can be a drawback for 3 plate, but regrinding helps. |
| Gate Location Flexibility | Limited (only on the parting line) | Highly Flexible (can gate on top/center) | 3 plate wins for superior part aesthetics. |
| Maintenance | Simpler, fewer moving parts | More complex, requires more maintenance | 2 plate is easier and cheaper to maintain. |
Ultimately, a 3 plate mold is an "efficiency premium." You pay more upfront to unlock a higher level of automation and quality, but only if your production volume is large enough to justify it.
Conclusion
A 3 plate mold automates production by separating parts from runners. It's a strategic investment for high-volume manufacturing, trading higher initial costs for long-term labor savings and superior part quality.
Understanding the basics of a 3 plate mold can help you decide if it's suitable for your manufacturing needs. ↩
Explore various gating options to enhance the efficiency and aesthetics of your molded parts. ↩
Discover the role of the runner system in injection molding and its impact on production. ↩
Understanding parting lines is crucial for effective mold design and part quality. ↩
Explore the characteristics of high-volume production to assess your project needs. ↩
Learn how cycle times impact your overall production efficiency and costs. ↩